Creating a simple WordPress theme boilerplate involves setting up the basic structure and necessary files that every WordPress theme requires. I use LocalWP server for testing or even creating websites in my local environment before pushing it to production online. Here’s a basic example to get you started:
A Simple WordPress Theme Boilerplate Directory Structure
First, create a directory for your theme. Let’s name it simple-theme. And add the following files with extensions specified as below except screenshot.png(this will be added at last after we finish building the theme).
simple-theme/
├── style.css
├── index.php
├── header.php
├── footer.php
├── functions.php
├── screenshot.png
1. style.css
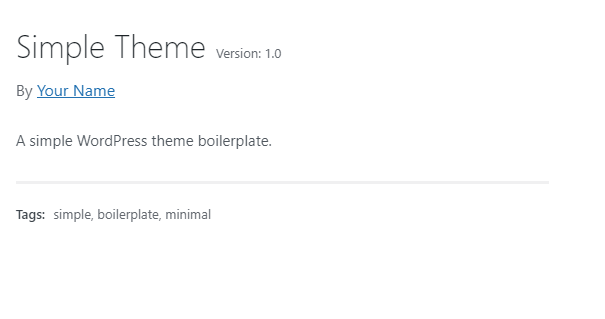
This file contains the theme information and basic styles. This is what we see on the description section of a theme. Add the below contents inside style.css.
/*
 Theme Name: Simple Theme
 Theme URI: http://example.com/simple-theme
 Author: Your Name
 Author URI: http://example.com
 Description: A simple WordPress theme boilerplate.
 Version: 1.0
 License: GNU General Public License v2 or later
 License URI: http://www.gnu.org/licenses/gpl-2.0.html
 Tags: simple, boilerplate, minimal
 Text Domain: simple-theme
*/

body {

}

header, footer {
}

main {

}
And this is the result you can see after we finish building the theme(we are not yet reached there).

2. index.php
This is the main template file of the theme. Add the contents into index.php:
<!DOCTYPE html>
<html <?php language_attributes(); ?>>
<head>
    <meta charset="<?php bloginfo( 'charset' ); ?>">
    <meta name="viewport" content="width=device-width, initial-scale=1.0">
    <title><?php wp_title(); ?></title>
    <link rel="stylesheet" href="<?php echo get_stylesheet_uri(); ?>">
    <?php wp_head(); ?>
</head>
<body <?php body_class(); ?>>
    <?php get_header(); ?>

    <main>
        <?php
        if ( have_posts() ) {
            while ( have_posts() ) {
                the_post();
                the_title( '<h1>', '</h1>' );
                the_content();
            }
        } else {
            echo '<p>No content found</p>';
        }
        ?>
    </main>

    <?php get_footer(); ?>
    <?php wp_footer(); ?>
</body>
</html>
3. header.php
This is the header template file. You may have seen get_header() function in the main template file in the head section. The contents of this file will be loaded over there by using this function.
<header>
    <h1><?php bloginfo( 'name' ); ?></h1>
    <p><?php bloginfo( 'description' ); ?></p>
</header>
4. footer.php
This is the footer template file. Like header.php, get_footer() of index.php gets it’s content from this file.
<footer>
<p>© <?php echo date('Y'); ?> <?php bloginfo( 'name' ); ?></p>
</footer>
5. functions.php
This file is used to set up the theme and add extra functionalities.
<?php
function simple_theme_setup() {
    // Add default posts and comments RSS feed links to head.
    add_theme_support( 'automatic-feed-links' );

    // Let WordPress manage the document title.
    add_theme_support( 'title-tag' );

    // Enable support for Post Thumbnails on posts and pages.
    add_theme_support( 'post-thumbnails' );

    // Register navigation menu
    register_nav_menus( array(
        'primary' => esc_html__( 'Primary Menu', 'simple-theme' ),
    ) );
}
add_action( 'after_setup_theme', 'simple_theme_setup' );

// Enqueue scripts and styles
function simple_theme_scripts() {
    wp_enqueue_style( 'simple-theme-style', get_stylesheet_uri() );
}
add_action( 'wp_enqueue_scripts', 'simple_theme_scripts' );
6. screenshot.png
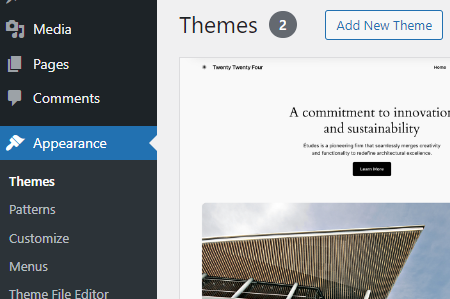
Add an image file named screenshot.png in the theme folder. This will be used as a thumbnail in the WordPress theme selection screen. You can create a simple image with the name of your theme. For this example I am simply using the screenshot from the theme Twenty Twenty Four.

7. Test your theme
Now that we finalized the theme and ready to ship, its time to activate your theme. Before that, let’s compress this file if you created the folder outside of the development environment. Compress your simple-theme folder: simple-theme.zip .
Go to WP Admin -> Appearance -> Themes. And click on Add New Theme button.

Now Click Upload Theme. And upload simple-theme.zip, install and finally, activate it.
Additional Files (Optional)
Depending on your requirements, you might want to add more template files like single.php, page.php, archive.php, etc. I will dive deep into the specifics of all these files in my upcoming course on WordPress theme development. For this boilerplate, the basic structure is sufficient to get you started.
Consider using WPEngine as your server once you completed building the site:
Level up your website’s performance with WPEngine once you’ve completed building your site! Enjoy blazing fast speeds, robust security, and seamless WordPress integration. Transform your hard work into an exceptional online experience with WPEngine’s premium hosting solutions!
WPE4FREE – 4 Months Free on Annual Plans
